
As an Amazon Associate, I earn from qualifying purchases
If you are serious with your home kitchen, you should know, how to paint your kitchen cabinets with air spray gun. But here is another way, you may like. And if you like, you can follow.
Introduction
Instead of buying new kitchen cabinets, why don’t you use an air spray gun to repaint the old ones? With a quality spray gun and some gallons of paint, you can give your kitchen a fresh look.
Painting involves three easy steps. First is the preparation where you disassemble the cabinets; mask all areas surrounding the cabinet; then sand, clean and patch the surfaces.
The second step is to prime the cabinets. And lastly, is to paint using an air spray gun.
There you go, the process is as simple as that. But let us explain these steps in details.
Preparation
Just as you would do in any other successful paint task, preparation is important. Though the step consumers lots of time and energy, ignoring it affects the outcome of your finish.
Disassemble Cabinet
The first thing in your preparation is to disassemble the cabinets. Start by unscrewing the drawers and doors from the cabinets.
Remove every cabinet fixture (knob, handle, etc.) and hinges on the drawers and doors. You can put these fixtures and hinges in a plastic bag. But before you do so; ensure you label each of the removed items.
You can use a piece of painter’s tape to number the cabinet doors and their frames.
This will make the matching easy during re-installation after painting. If it is possible to remove the kitchen cabinet boxes, you can do so in this step.
Nonetheless, place all the removed items in your preferred area such as a covered patio, dry/clean garage or a large workshop.
Mask All Areas Surrounding the Cabinet
Another important thing to do here is to mask all areas surrounding the cabinet (walls, appliances, flooring, and counter tops, among others). Use painter’s tape and sheet plastic to cover these areas.
Instead of plastic sheeting, a drop cloth is highly suitable for covering the flooring as it’s not slippery.
Sand, Clean, and Patch
Apart from masking every area, you should also, sand, clean and patch all surfaces. Use fine grit sandpaper on an unsystematic orbital sander to lightly sand down every surface.
Sanding helps in removing the sheen and not to remove every paint layer and coatings. Therefore, you should be cautious when sanding thermofoil-coated cabinets.
This is because excessive sanding can shred off their micro-thin layer.
After sanding, the next step is to clean these surfaces. Use TSP and warm water. Pay attention to oven and stove areas as they are always greasy. Give these items time to dry completely.
Once dry, you should use wood putty to patch minor holes and cracks. When the surface has dried, you can sand down this wood putty.
Then clean this area again using a tack cloth – just to eradicate any residual dust.
Prime
To avoid peeling, you should prime your kitchen cabinets before painting them. Likewise, priming will help in covering any tiny imperfection whilst giving a great adhesion.
For an excellent finish, you should invest in quality coatings. Additionally, you can request the paint store to tint the primer (which normally comes in base or white color).
Doing so will help in getting a primer than blends with your paint color. Apart from tinting the primer, ensure you spray two coats of primer. However, give the first primer at least one or two hours to dry completely.
Use a paintbrush to apply a stain-killing primer. Here you can use a disposable or cheap brush – don’t mind about the brush strokes. After all, you’ll do away with them using sandpaper.
When the primer is entirely dry, you can now use 320-grit sandpaper to lightly sand the cabinets and doors. This will remove all the brush strokes (as mentioned earlier).
Fix dings, holes, and scratches with a speckling compound. It is advisable to use a putty knife to work this compound into any damaged surface. Doing so will ensure your finish is smooth.
When the compound is dry, sand with medium-grit sandpaper, then apply another primer coat.
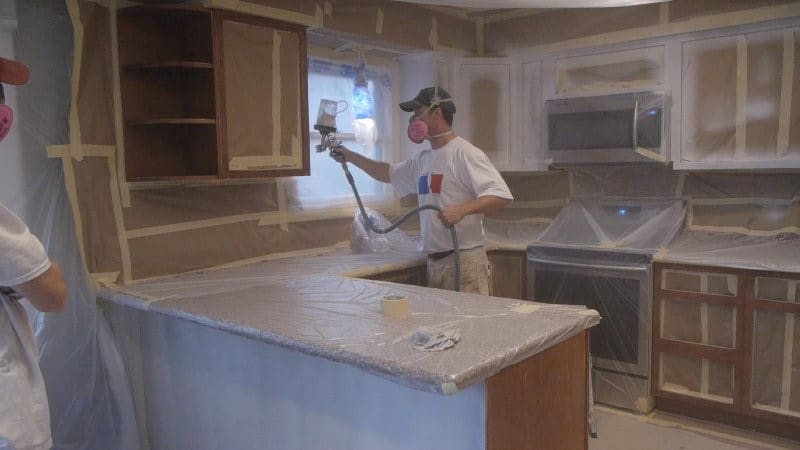
Paint
Now the fun part begins! Before you begin paint-spraying your kitchen cabinets, experiment on an old cardboard or large piece of a box. Have you ever used an air spray gun?
If not, don’t worry as it’s really easy to use. It just takes a few experimentation. Would you like to paint your cabinet doors on both sides?
If so, paint the inside part first. That way, you’ll learn early in case you have a problem or make a mistake. More so, it will save you time because you’ll get used to the gun.
Painting the walls is a great idea. But ensure you spray paint the cabinets first – you’ll save time and hassles in taping off these walls.
Alternatively, if you intend to paint only on the outer side, spray down with the first color coating. Here, you should go lightly and be patient. If you rush the spray paint it will lead to splatter and drips.
Spraying down the drawers and door fronts for a medium-sized kitchen can take around an hour. Give the first coating at least 4 hours or more to dry before you apply the second one.
Whether or not you want to give the inner side a second coat lies on you.
For sure, the outer side of the cabinets requires a second coat. This is necessary as it fills in thin streaks and spots. Also, a second coat provides a uniform, smooth coating that is highly durable.
Installation
Before replacing the drawers, doors and cabinet boxes, let them dry thoroughly (at least 24 hours). Failure to do so leads to a possibility of imprinting your fingerprints on paint that might look dry – while it’s not.
After you have put these items back into their respective places, you can install the door handles, pulls, and knobs.
If some paint leaked into the hinge holes, you can scrape it out to ensure the hinges fit comfortably.
The Bottom Line
After a successful paint, ensure you clean your air spray gun. This is a really simple process. It involves emptying the unused paint out of your spray cup. Put warm water in the cup and spray it out till the water runs clear.
Needless to say, paint spraying your kitchen cabinets is a wise decision. You don’t have to spend a fortune buying new cabinets while you can renovate the ones you have already.
Using a spray gun is advantageous over a brush or roller. Ultimately paint spraying kitchen cabinets provides a smooth finish in the least time possible.
Nonetheless, you should invest in quality paint and prepare your cabinets to get great results. Follow the steps we have discussed above to give your cabinets a new, fresh look.